1-2-3 Sprinkler system for water pipeline - Configuration
Assemble your own sprinkler system with our pre-assembled and assembled kits. First read this manual at the bottom and then choose the right parts..
-
 1-2-3 sproeisysteem voor leidingwater - maximaal 2 zones - configurator
Starting at €21.83
In stock- Modulair verzonken sproeisysteem
- Maximaal 250m2
- Direct kostenoverzicht
-
 1-2-3 sproeisysteem voor leidingwater - maximaal 4 zones - configurator
Starting at €21.83
In stock- Modulair verzonken sproeisysteem
- Maximaal 450m2 op leidingwater
- Direct kostenoverzicht
-
 1-2-3 sproeisysteem voor maximaal 6 zones - configurator
Starting at €21.83
In stock- Modulair verzonken sproeisysteem
- Maximaal 750m2 op leidingwater
- Direct kostenoverzicht
-
 1-2-3 sproeisysteem voor leidingwater - maximaal 8 zones - configurator
Starting at €21.83
In stock- Modulair verzonken sproeisysteem
- Maximaal 1.000 m2 op leidingwater
- Direct kostenoverzicht
Assemble your own sprinkler system with our pre-assembled and assembled kits. First read this manual and then choose the appropriate parts.
This manual is a guide for implementation of a sprinkler system for self-assembly on water pipes, intended for the Prefab wells, sprinkler sets and connection sets.
It includes a number of practical tips that can easily be used to design a sprinkler system modular by yourself.
HOW TO ASSEMBLE A SYSTEM
Make a sketch of the garden and do it to scale, preferably 1 to 100, so every inch is a meter.
In it, clearly draw in the house, paving, patio, pond, and other defining features.
Make it clear where lawn, planting, and hedges are.
At this point the garden is in the picture and a sprinkler system can be designed.
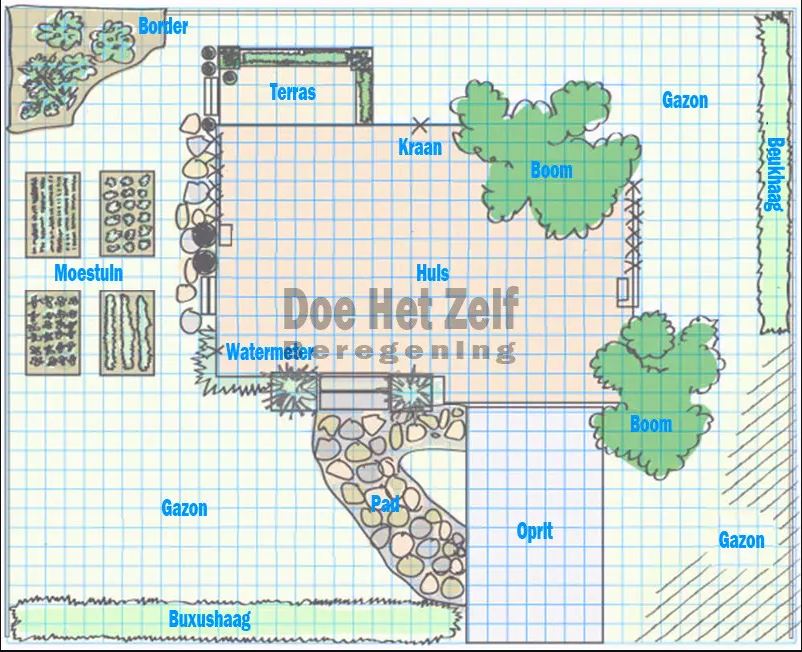
DRAWING
Start by drawing in the large turbine nozzles and follow later with the smaller spray nozzles and any drip hoses. Take a compass and use it to plot the spray jet.
The nozzles have the following specifications to consider:
- Pop-up turbine sprinkler 3504 - reach 4-8 meters
- Pop-up turbine nozzle 5004 - range 5-9 meters
- Pop-up misters 1800 series - reach 2-4 meters
- Drip hose can be placed in 1 line, distance between them 40cm
- All sprinklers are infinitely adjustable in spray angle, so in the garden can always be adjusted.
Observe the following rules:
Initially place the sprinklers as much as possible on the side of the house or right next to the patio. All sprinklers are adjustable and can be set so that the water does not hit the facade or window.
So always spray from the house into the garden!
In certain cases it cannot be done this way, make sure that the water never hits the facade with sufficient distance.
Put sprinklers as much as possible at jet distance, so if the sprinkler is going to spray 7 meters, put the next sprinkler at 7 meters distance. This is the only way the precipitation will be properly distributed. In the example we have filled in the various sprinklers, the arrangement is each garden's own, of course, as you see fit.
EXAMPLE SETUP
In the design below, the sprinklers and drip hose are drawn in, the circles are the spray jets.
Dotted line is drip hose
Round dots are pop-up misters (Rain Bird 1800)
The 6 corners are the pop-up turbine nozzles (Rain Bird 3504)

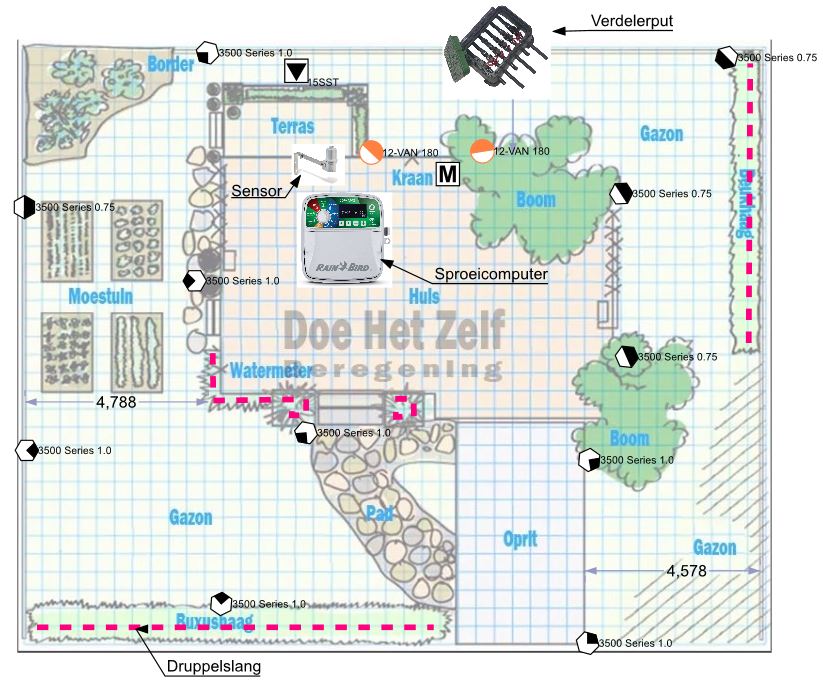
WATER SUPPLY
Now determine the water supply and mark it on the drawing.
With tap water there is the choice of connecting to an outside tap, but it is better to make a connection as close as possible to the water meter. We have various connection sets for this.
MAIN
Each connection set has a manual shut-off valve to depressurize the installation. During the season it will remain open and the distributor will remain under water pipe pressure constantly.
Fine in itself, but when the distance is a bit longer, an electric main valve can be installed for safety. This ensures that the supply line to the sprinkler system is pressurized only when spraying occurs. Each spray computer has a separate connection for a main valve. Once one of the spray zones is activated, the main valve will open. Connection is easy. A main valve is not included as standard. An appropriate valve is, for example, the RainBird DV100, code 3021510.
Determine the location of the group divider/zone divider. Depending on the situation, there will be multiple spray zones. Draw the group divider in on the drawing. In our example we are talking about a large garden for water mains, therefore 8 sprinkler zones now. (Each 2 sprinklers on a separate zone).
Determine the location of the sprinkler computer, preferably inside a shed, garage or utility room. The sprinkler computer is in many cases equipped with Wifi so make sure it is located where wifi is available. The operation is then later very easily with the phone or tablet and a nice app.
EXAMPLE DRWAING WITH LOCATIONS
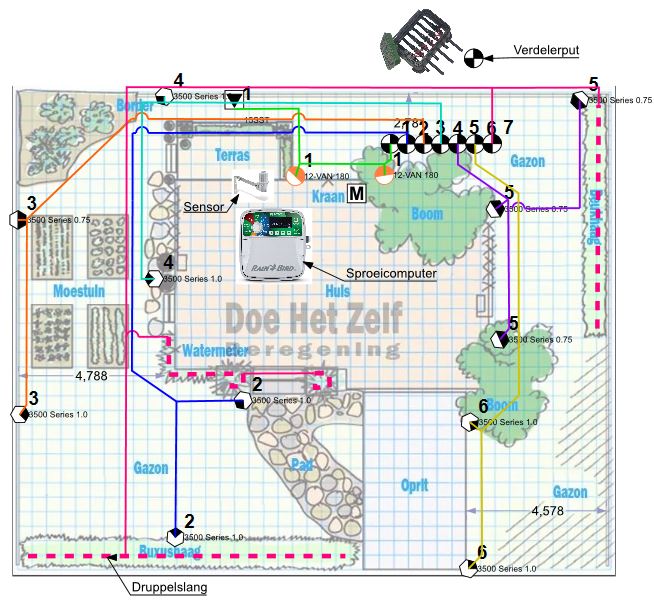
ASSEMBLING SPRAY ZONES - WATER PIPELINE
In the sprinkler plan the number of sprinklers is drawn in and they should be divided into more or less equal zones. At each time, 2 (and sometimes 3) sprinklers can spray at the same time, so if 10 sprinklers are drawn in, there will be 5 separate lines with 2 sprinklers each coupled. In the extreme case that there should be 3 sprinklers coupled at the same time, take the zone closest to the manifold and the sprinklers that have to cover the shortest distance. (In our example, this is at Zone 1 and 5)
The pipe from each zone comes out at the central manifold point and is coupled to the recessed groups manifold. (shown here schematically but can be placed logically in practice.
If a drip line is also planned, always place it separately on a zone. Tap water can normally supply 100-150 meters of drip line at a time.
In our example, there are now 6 spray zones and 1 drip zone. So a distributor of 7 zones is required for control. The great advantage is that for each garden section can be determined separately when and how much water is sprayed.
We offer the choice of various ready-made sets with 2 sprinklers, corresponding pipe and couplings, directly fitting to a zone of the distributors.
Choose the number of spray sets (turbine sprayers with a rotating jet, misters with light mist or drip hose for hedges and tall plantings)
In our example, each set is done with a separate color to make it clear how the distribution is made.
VOORBEELD TEKENING OVERZICHT
As a water supply connection, with a choice of 3 sets for water pipe, the right one for your situation can be chosen: Direct to the outdoor tap, branch from a 15mm copper pipe or branch from a 22mm copper pipe.
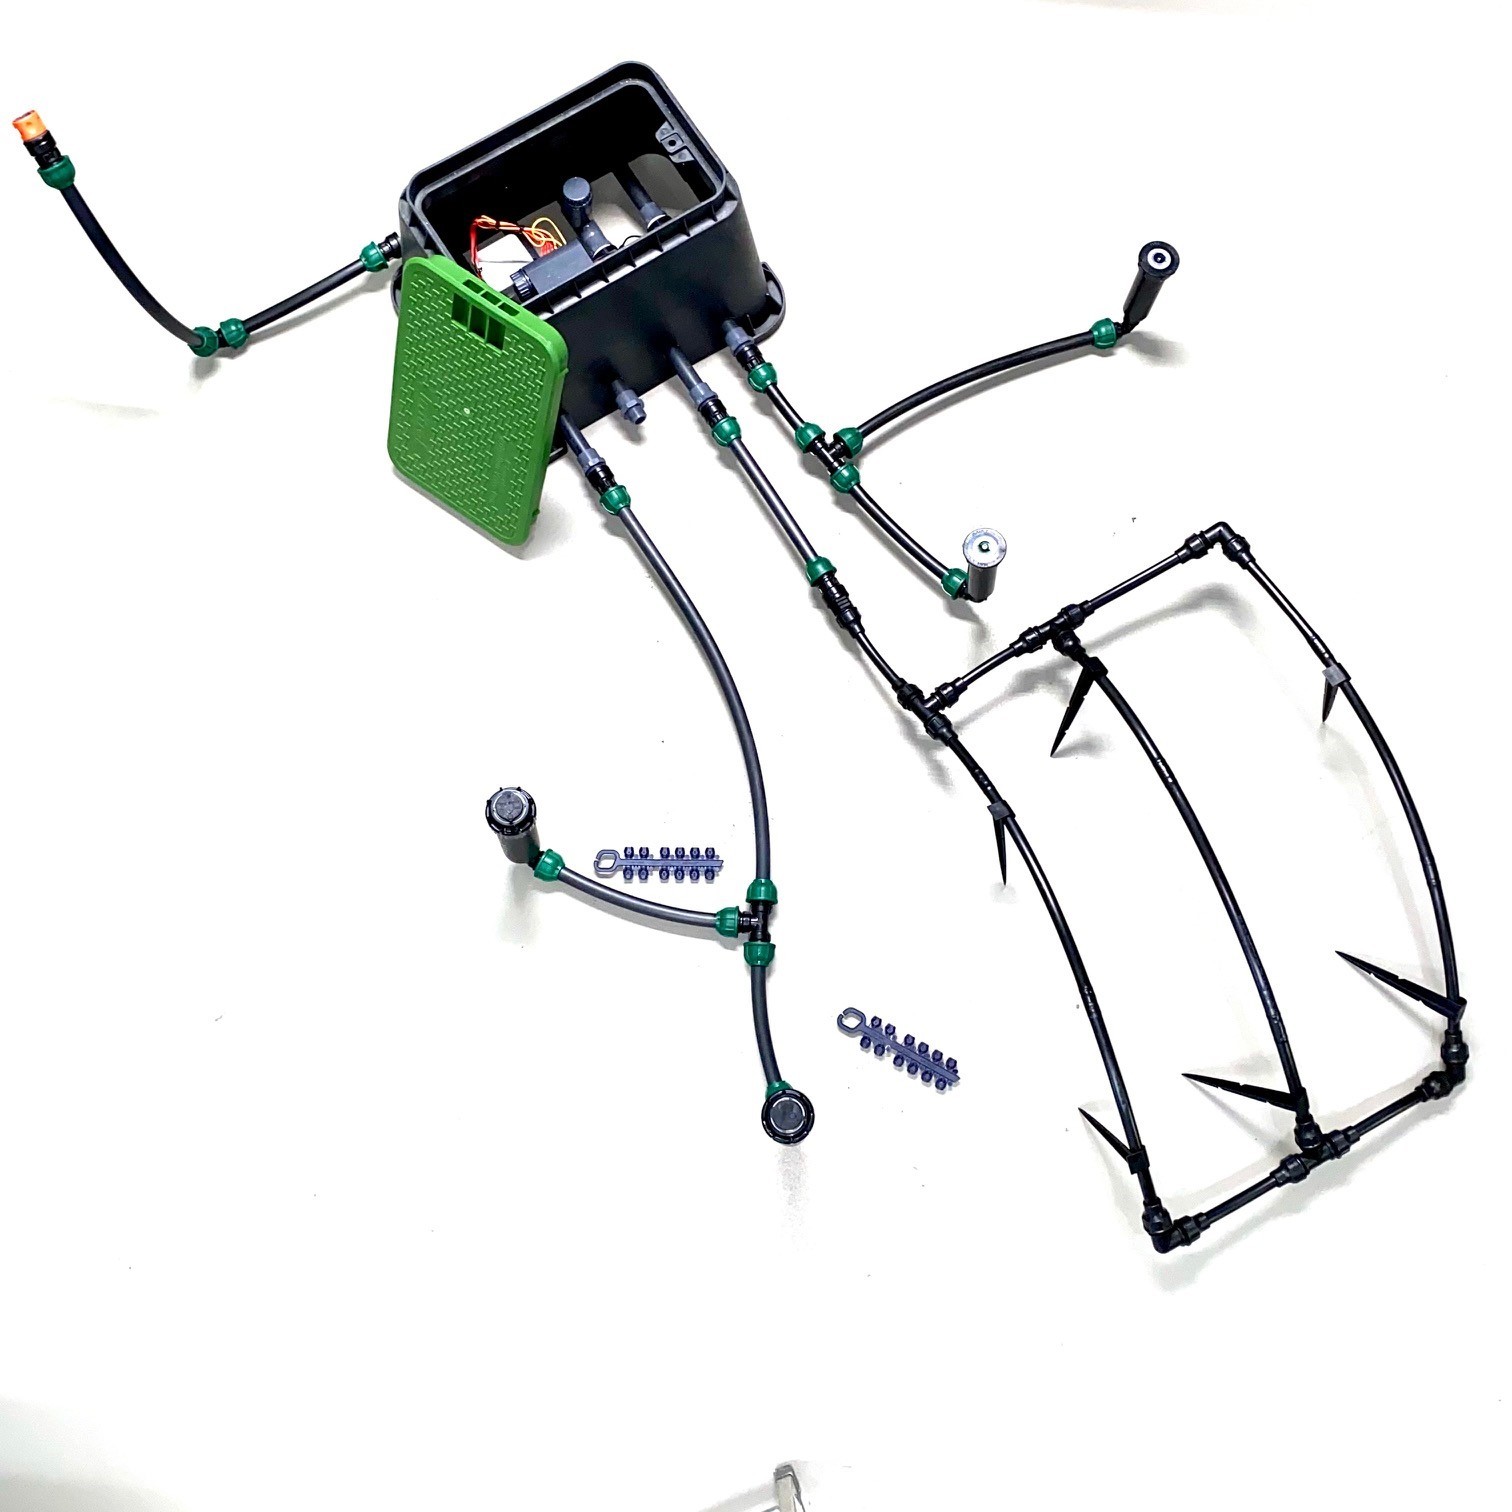
PRACTICAL COMPOSITION IN VIEW
Based on examples, you will understand the logic of connecting the various predestined modules.
If you implement the installation with these modules, the system will always function. The only requirement is that the water supply must be over 950 liters per hour. For this, do the bucket test : A 10 liter bucket should be able to be filled within 25 seconds.
Always set the sprinklers so deep that the top at rest is at ground level. In short, the lawn mower can drive over it with its wheels.
In all cases, the pipe remains below the level of the sprinkler and may lie in the field with ups and downs. Any water left behind is not dangerous for the pipes in winter, as long as the sprinklers themselves are empty !
The use of Polyethylene pipe gives the opportunity to create a flexible path through the soil. Make sure the pipe is not too tight in the trench and test the entire system before sealing the trenches.
Cut the pipe with pruning shears and avoid using a saw due to the sawdust that may clog the nozzles.
Polyethylene itself is not susceptible to frost damage.
Ensure that the leidng always properly in the clamp coupling, always push it past the rubber ring and tighten the swivel by hand.
Each spray kit is equipped with a connection coupling for the manifold.
Good luck with the design and construction of your sprinkler system !
De voordelen van
Tuin & Water

- Al meer dan 25 jaar ervaring
- Zeer scherpe prijzen
- 60 dagen bedenktijd
- Grote showroom in Dussen
- Veilig bestellen met Webshop Keurmerk